Diagramming System Design: Rate Limiters


All production-grade services rely on rate limiters - when a user may post at most five articles per minute, or when an API responds at most 500 times an hour, or when a download is slowed down after some data is transferred, there is a rate limiter at work.
In this blog post, we'll share everything you should know about rate limiters, including what rate limiting is, why implementing rate limiting is necessary, and how to design effective rate limiters to protect your system from overload, reduce costs, maintain system stability, and ensure fair access for all users. By the end, you'll have a clear understanding of how rate limiters help keep systems stable and efficient.
Rate limiting restricts the flow of requests that a server will accept in a time window. Whenever a caller exceeds this limit within this period, the rate limiter denies any excess requests, preventing them from ever reaching our server.
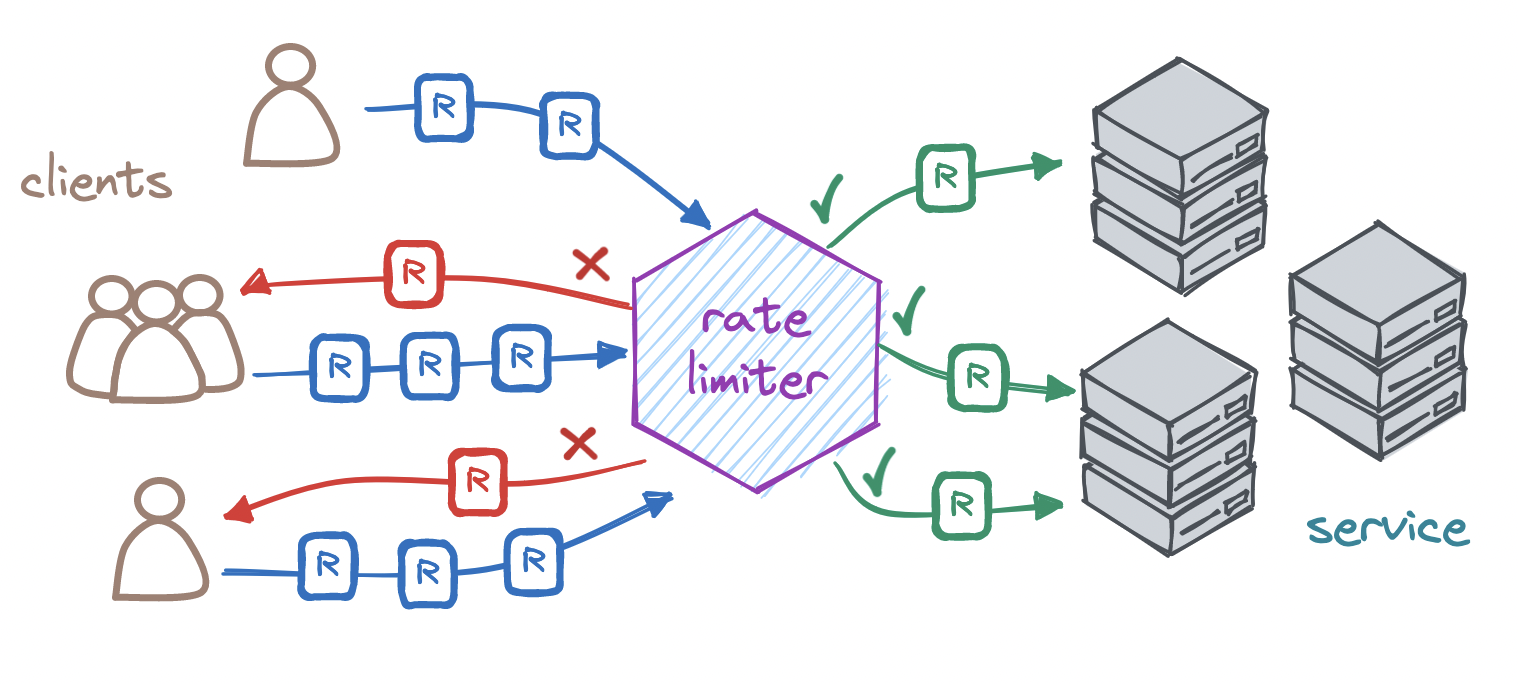
Implementing rate limiting has the following benefits:
Let's look at the main factors to consider when designing a rate limiter.
When designing a rate limiter, we need to choose the right rate limiting strategy depending on who our clients are, what our clients' expectations are, and what level of service we can offer.
Specifically, we should find out the anticipated number of callers, average and peak number of requests per client, average size of incoming requests, likelihood of surges in traffic, max latency our callers can tolerate, what our overall infrastructure looks like, and what it can achieve in terms of throughput and latency.
Only then can we start to define and implement rate-limiting rules:
Let's unpack some of these aspects.
The most common response to a rate-limiting request is to block the excess request by returning the HTTP status code 429 (Too Many Requests) or 503 (Service Unavailable), with headers indicating the rate limit and when to retry. We may also shadowban any identified abusers.
Since an abuser who knows they have been rate-limited might try to circumvent the limit, we can choose to accept their excess request, return them the HTTP status code 200 (OK), and simply not process it.
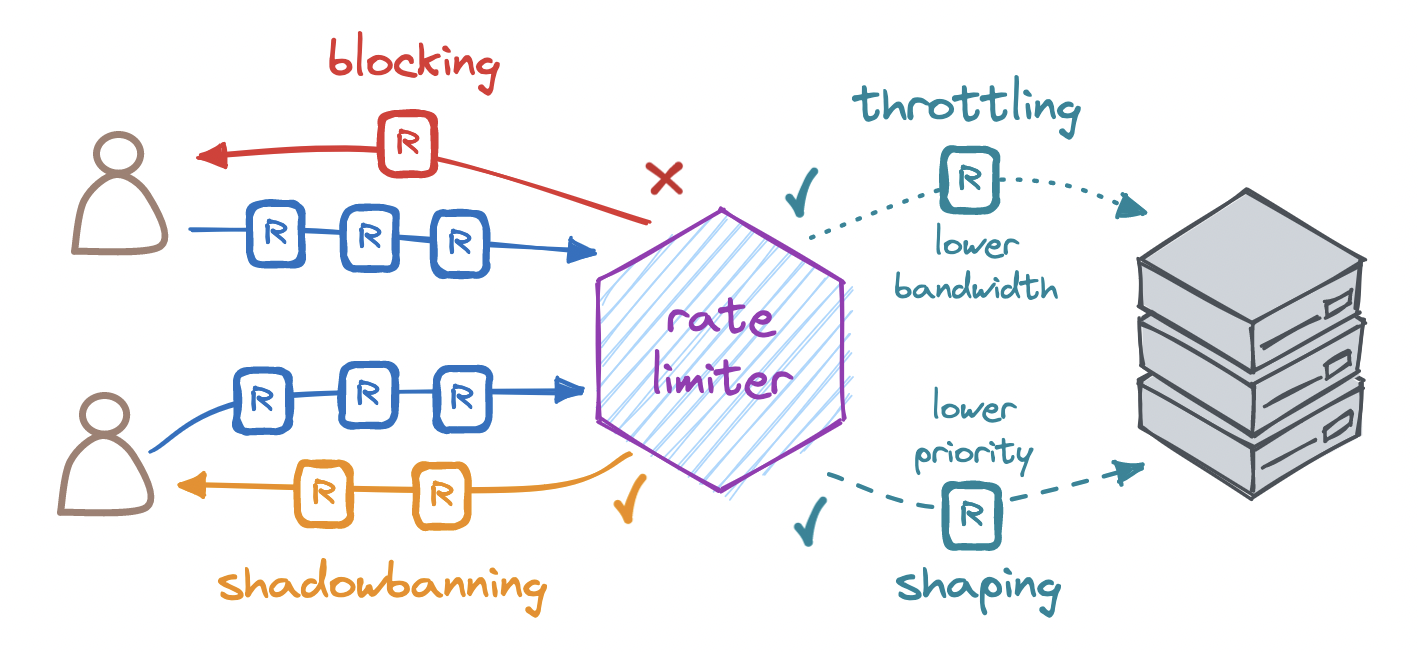
We can place the rate limiter at the edge of our system, at the entry point to our system, or inside our system, depending on the requirements.
For a rate limiter to operate, we must track rate-limiting state, i.e. information about the number of requests made by each client in a time window. It is based on this state that we can decide whether to accept or deny a request.
The most straightforward option is in-memory storage. If we have a single server or store for rate-limiting state, we may choose to keep this state entirely in memory. But note that this solution only fits a low-scale service - with multiple servers or stores, we must choose between centralizing and distributing state storage.
If we store this state in a centralized store, we add latency to the response, create a potential bottleneck in our system, and run the risk of race conditions. Since on each request we read the state, increment it, and write it back to the store, it can very well be the case that multiple concurrent requests all simultaneously read the same state, increment it, and write it back, bypassing our rate limit.
By contrast, if we keep this state in distributed storage, we can scale out horizontally to multiple stores, hence no bottleneck in our system. But this means we will have to synchronize state across all the stores. Whenever a request arrives and the read-increment-write cycle completes in one store, we must update the state in all other stores. And given the delay in updating state across all instances, we introduce the possibility of inaccuracies in rate-limiting state. Depending on the use case, these inaccuracies may or may not be tolerable.
When you're choosing a rate limiting algorithm, it’s important to balance efficiency with accuracy, as some methods offer better performance while others provide more precise control over the request rate.
Fixed window counter is an intuitive first option. This algorithm divides time into fixed-size time windows and keeps a counter for each of them.
Every request arriving within a time window increments the counter for that time window, and once the counter exceeds the limit, any subsequent requests from the client are denied until the current time window ends and a new one begins. With a rate limiter that allows, say, a fixed rate of at most five requests per minute, if a sixth request arrives before the minute is up, the client's excess request is denied.
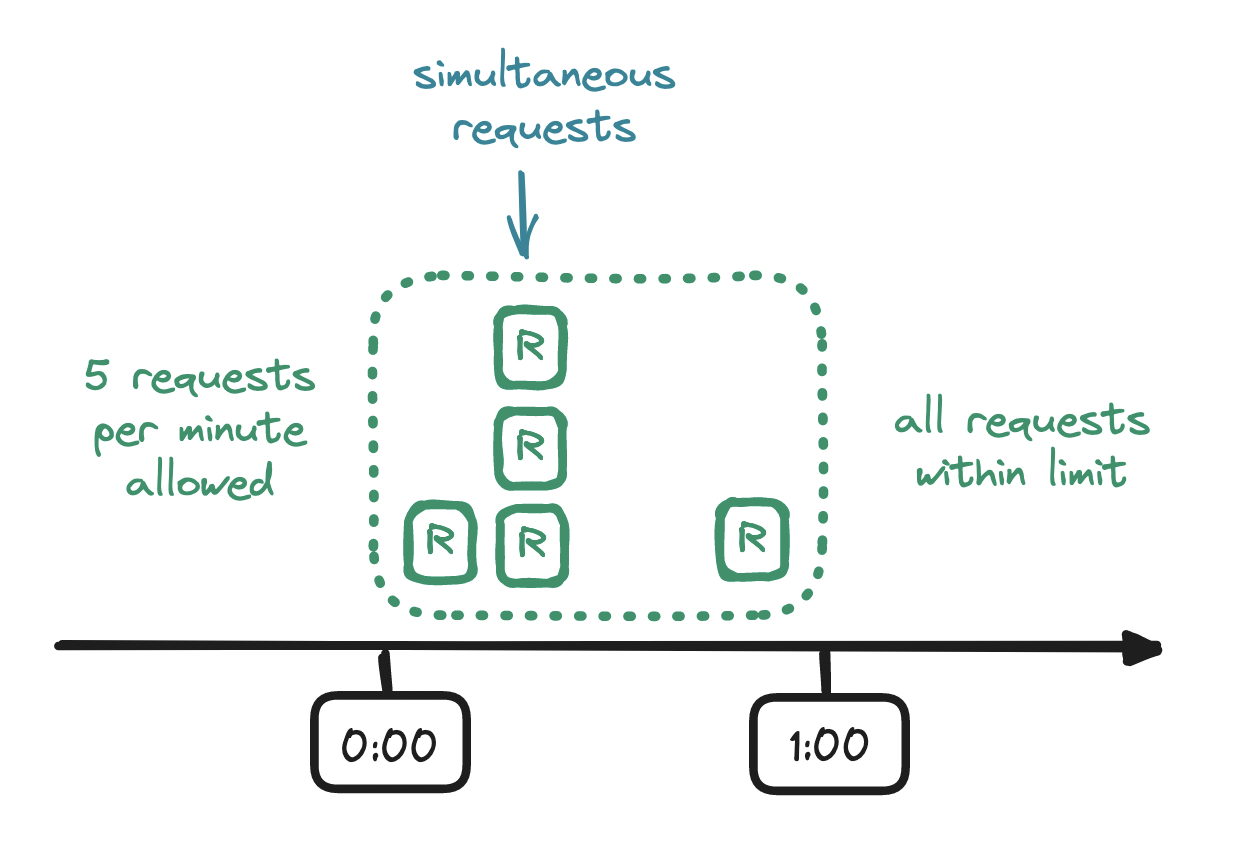
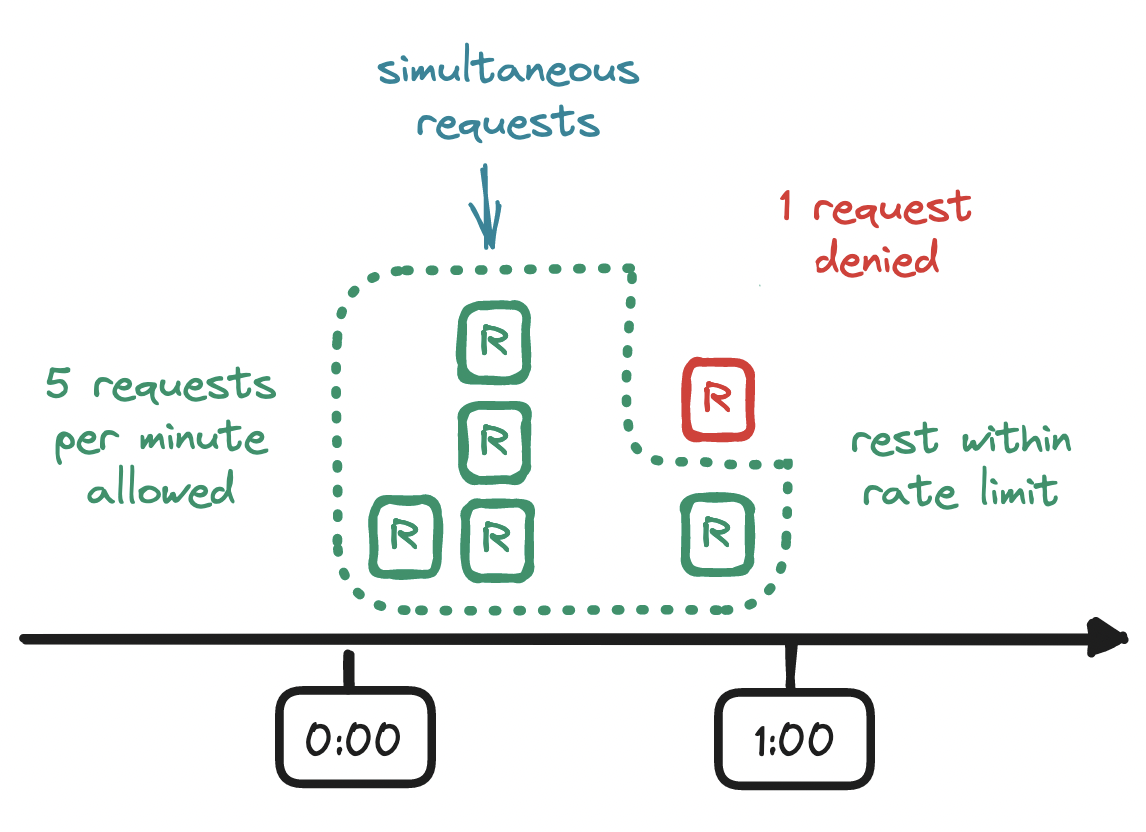
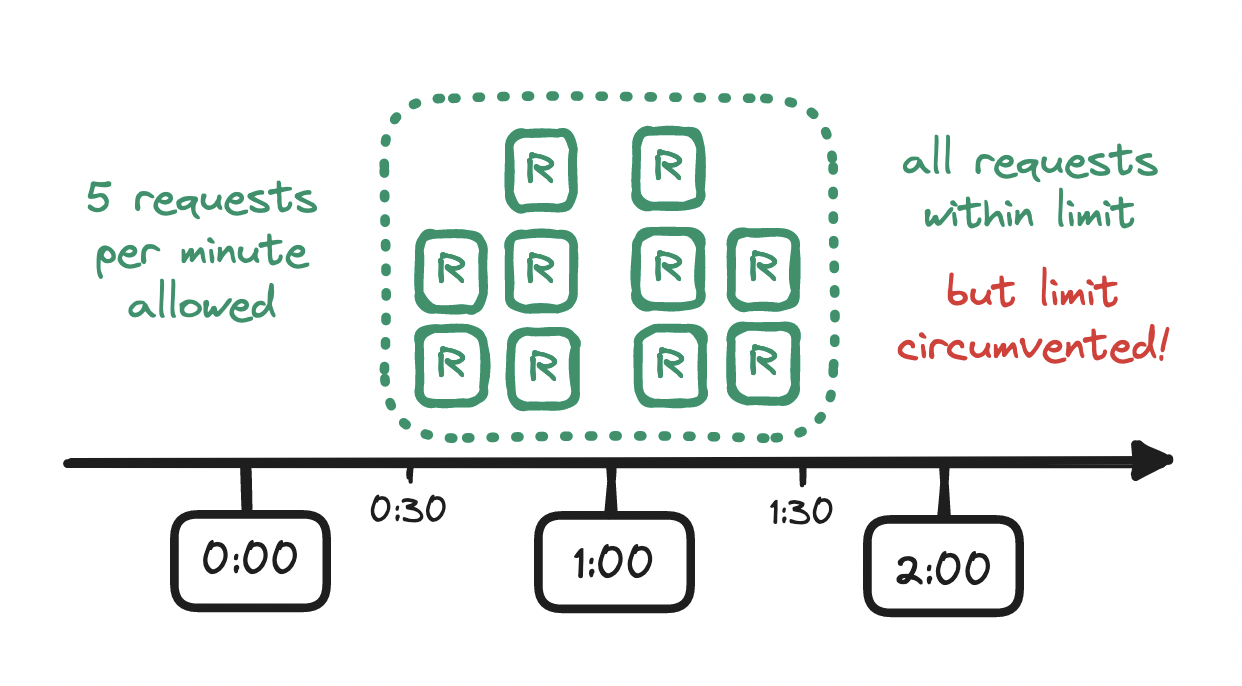
One issue with this approach: the rate limit is maintained only within the boundaries of the time window that we have defined, e.g. at the top of a minute, but not within time windows of equal length across those boundaries, e.g. at the midpoint of a minute. For example, if our limit is five requests per minute, and if a flurry of five requests arrives at the end of a minute, and if another flurry of five requests arrives at the start of the next minute, then we allowed twice as many requests as we should have allowed!
To mitigate this issue, we might reach for a sliding window logs algorithm instead.
With this rate-limiting algorithm, instead of counters in time windows, we keep a log of timestamps. For each incoming request, we add a timestamp to the log, and if we find that the addition caused the log size to exceed our rate limit, we reject the request. And importantly, before checking the log size, we clear outdated request timestamps, i.e. any timestamps outside the current time window. In short, we keep track of a sliding time window of timestamps.
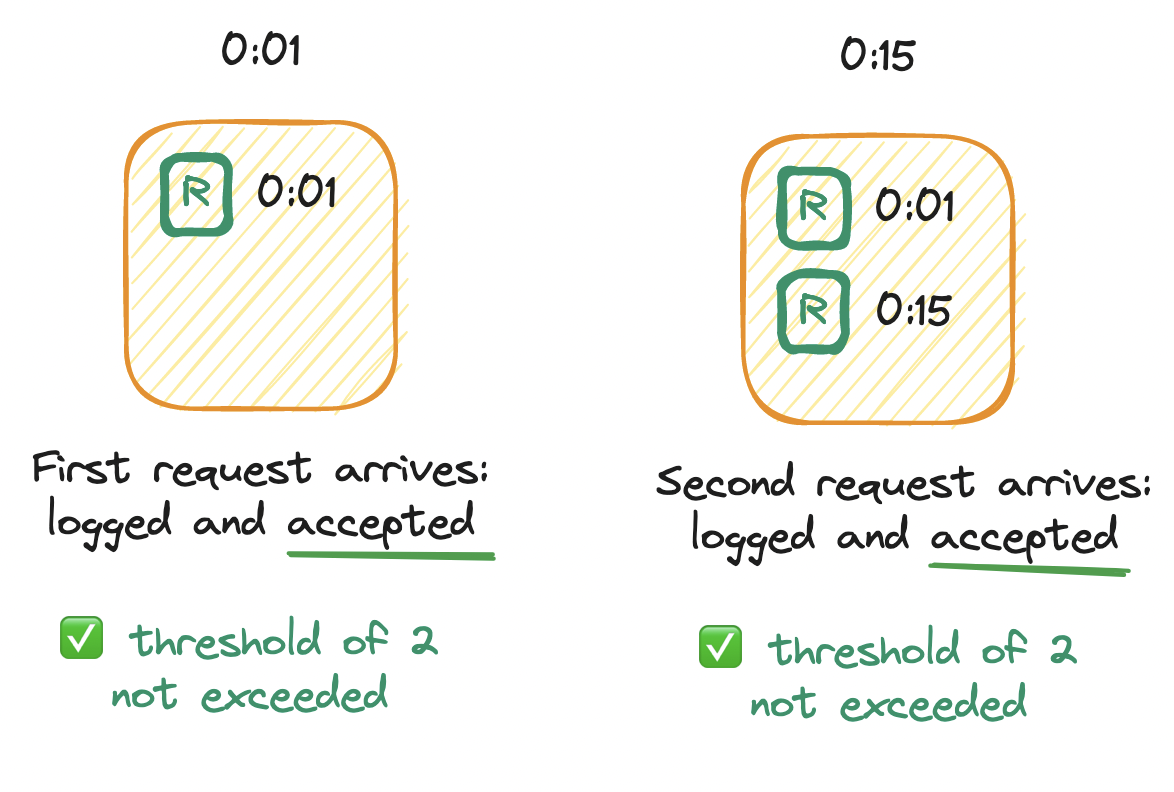
For example, imagine a rate limiter that allows up to two requests per minute. We deploy our service and set up an empty log. Immediately, at the first second (0:01), an initial request arrives. Per the algorithm, we add a timestamp to the log. The log size is now one, which does not exceed the limit of two, so the request is allowed. Later, at the fifteenth second (0:15), a second request arrives. Again we log the timestamp. The log size is now two, which does not exceed the limit of two, so the request is allowed.
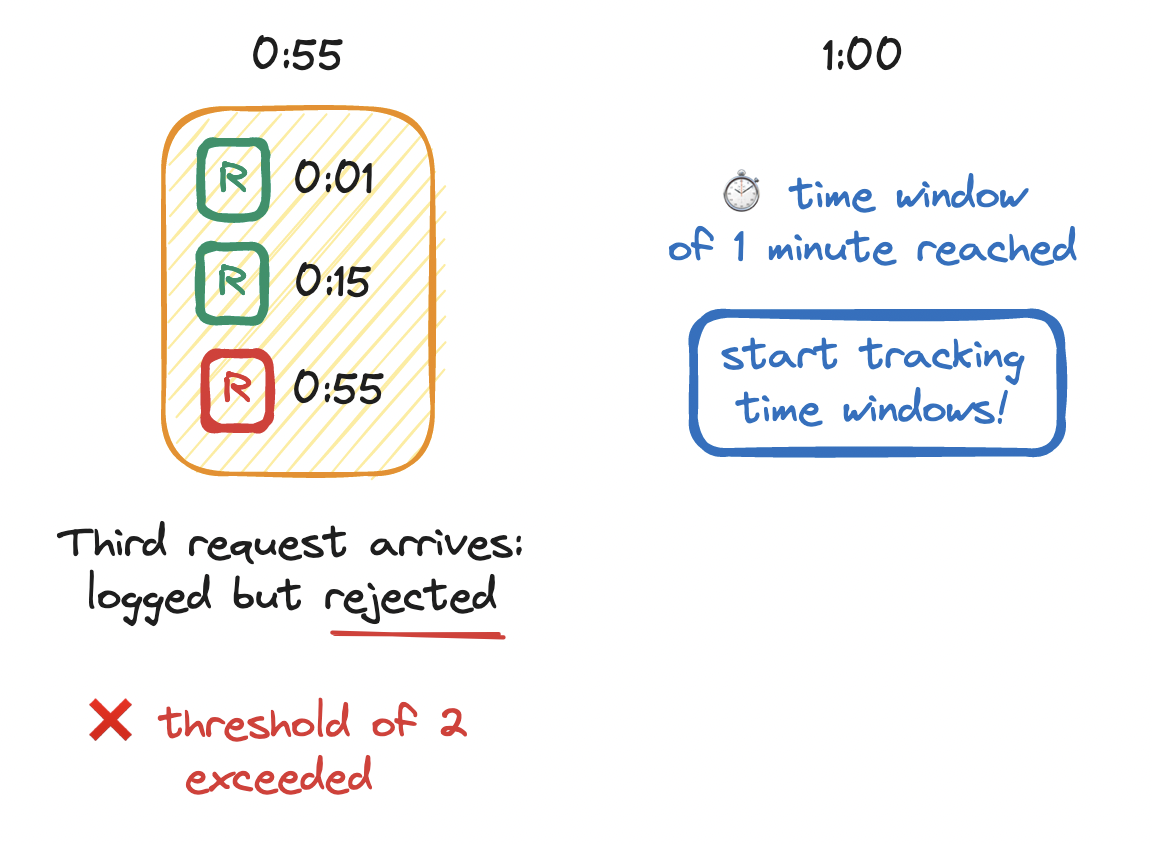
Next, at the fifty-fifth second (0:55), a third request arrives. We log the timestamp. The log size is now three, which exceeds the limit of two, so we deny the request. Soon after, at the top of the minute (1:00), we notice that the first time window of one minute has elapsed, so we make a mental note: from this point on we must clear outdated timestamps before checking the log size.
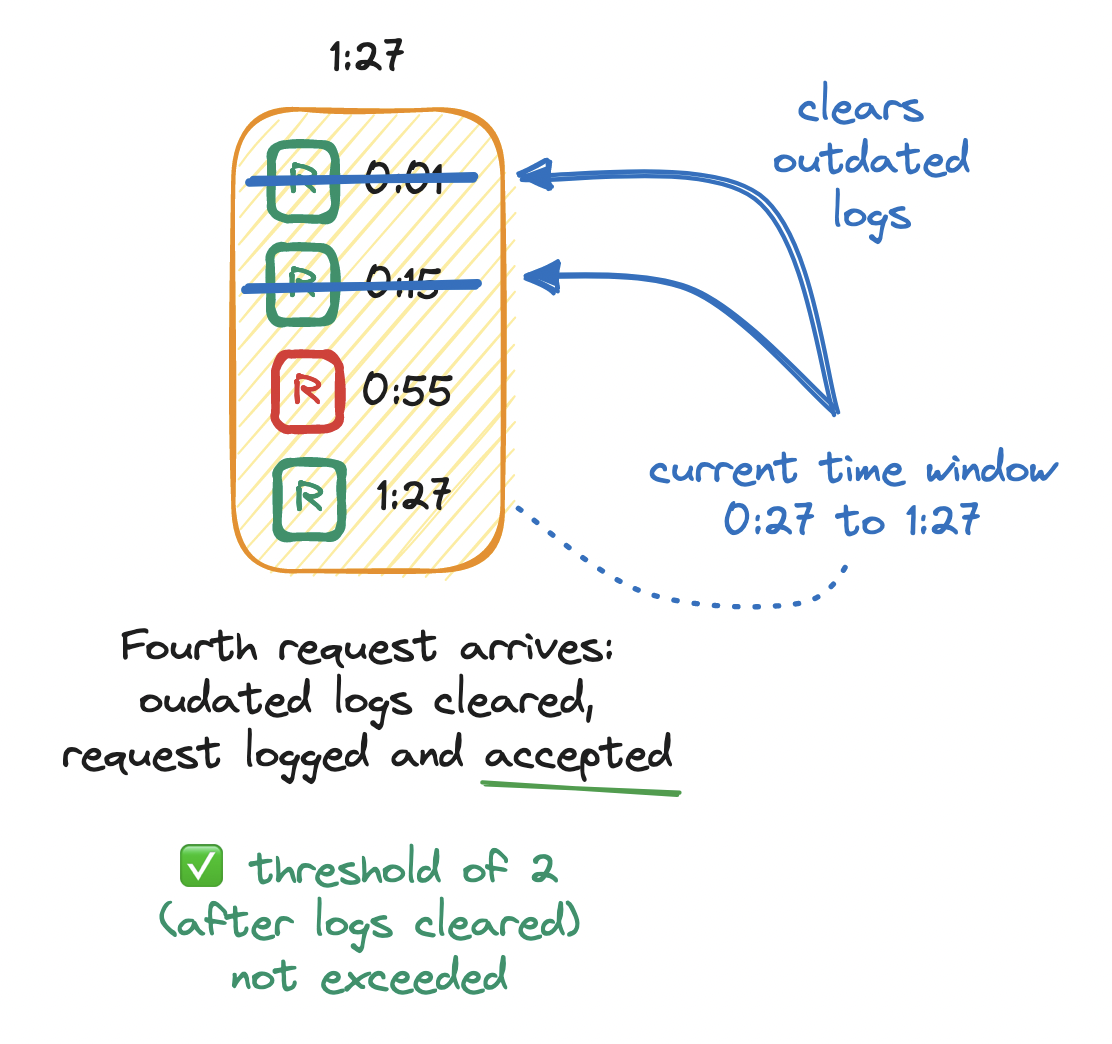
Then, at twenty-seven seconds into the first minute (1:27), a fourth request arrives. We append a timestamp to the log. Since we now know that we may have outdated timestamps in the log, we clear them. To do so, we look for any requests logged between the current point in time (1:27) and the start of its sliding window (0:27) and remove them from the log. The log size is now two, which does not exceed the limit of two, so the request is allowed.
Our rolling time window prevents requests from slipping by at the edges - there are no boundaries as in the fixed time window. But the sliding window log has its own issues. For one, this algorithm logs a timestamp for every request, whether allowed or not, which consumes significant memory. For another, it is wasteful to perform work (i.e. clearing outdated timestamps) on every request.
A more efficient solution, combining both approaches above, is the sliding window counter. This keeps two counters: one for the current time window and one for the previous time window. And based on them, we calculate how many requests arrived in the sliding time window, namely by weighting the requests in the previous time window based on its overlap with the sliding time window. On every request, we calculate the total and allow or deny the request based on the limit.
To understand this calculation, let's walk through an example. Imagine a rate limit of seven requests per minute. So far, we have received five requests in the previous minute and three requests in the current minute, and then a new request arrives eighteen seconds into the current minute (1:18).
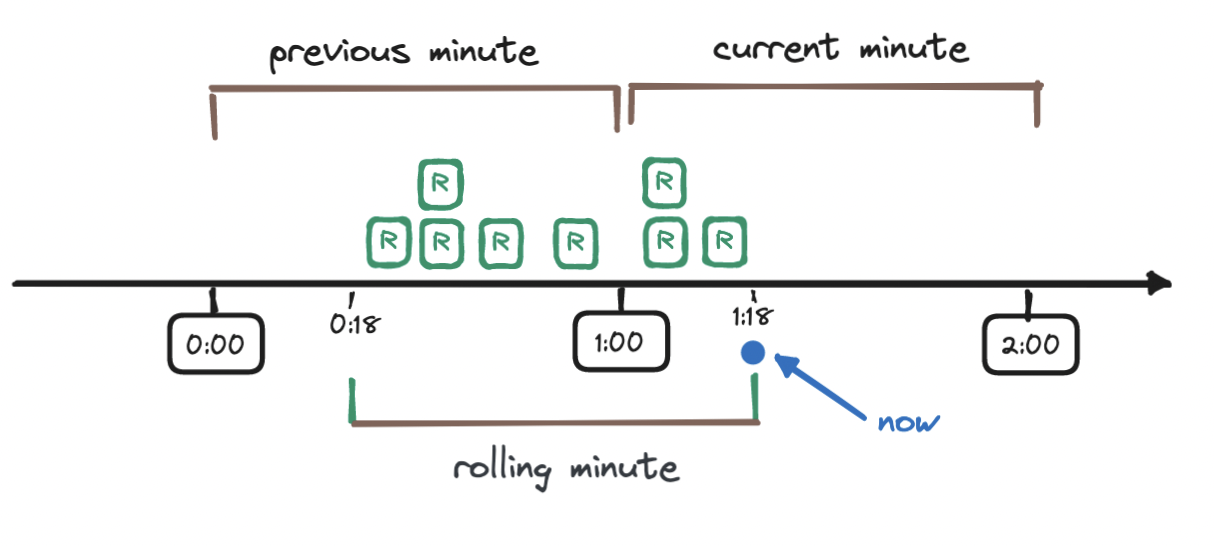
To calculate the weighted number of requests in the sliding window, we add the requests in the current window (three) to the result of multiplying the requests in the previous window (five) with the percentage of overlap of the sliding window and the previous window - this percentage is the weight.
To find out the weight, we observe how far along we are into the current window (18 seconds, which is 30% of 60 seconds) and take its difference from 100%, which means that in our case, the weight is 70%. Hence, the number of requests in the sliding window is 3 + (5 * 0.7) = 6.5
Depending on the use case, we may choose to round the result up or down, here we choose to round it down to six. Our rate limiter allows seven requests per minute, and so the request that triggered this calculation is allowed.
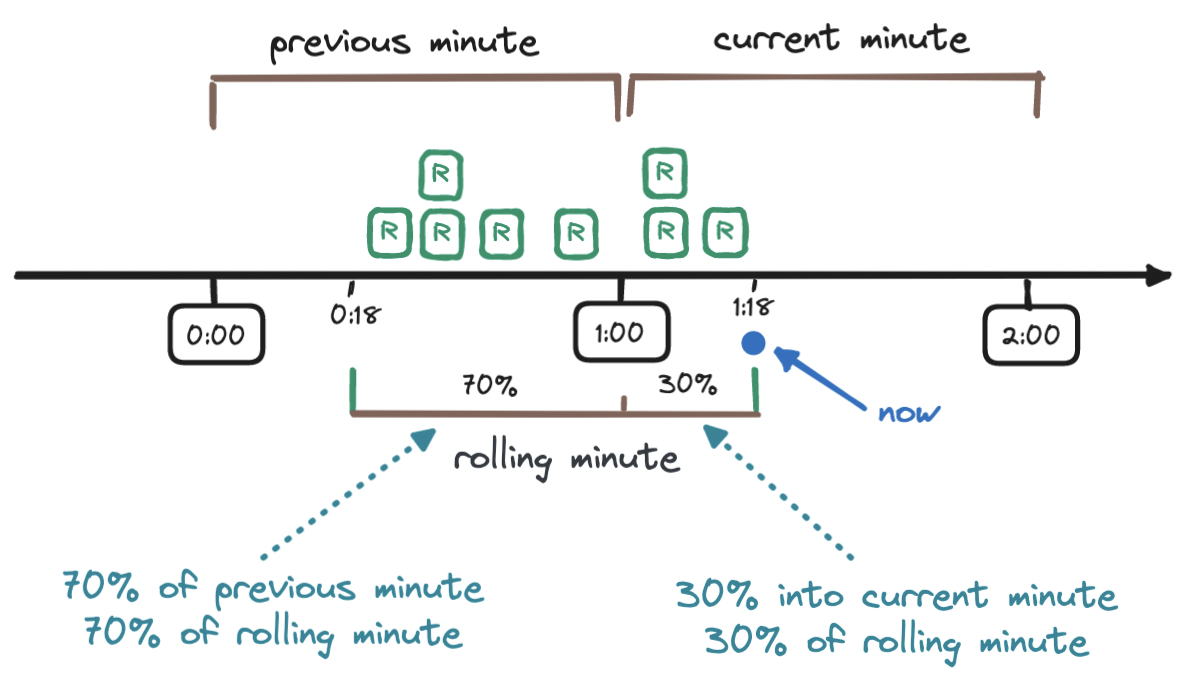
The sliding window counter requires less memory and less processing than the sliding window log, while being more accurate than the fixed window counter. This algorithm, however, assumes that requests are evenly distributed across the previous time window, which might not always be the case!
Another efficient algorithm that is easy to implement is the token bucket algorithm.
Imagine a bucket that can hold a number of tokens. Every second, the bucket is refilled with a number of tokens. Refilling a full bucket has no effect. Whenever a request arrives, we remove a token from the bucket and allow the request, but once we cannot remove a token because the bucket is empty, the request is denied. Thus, our rate limit is expressed in terms of bucket size and refill rate.
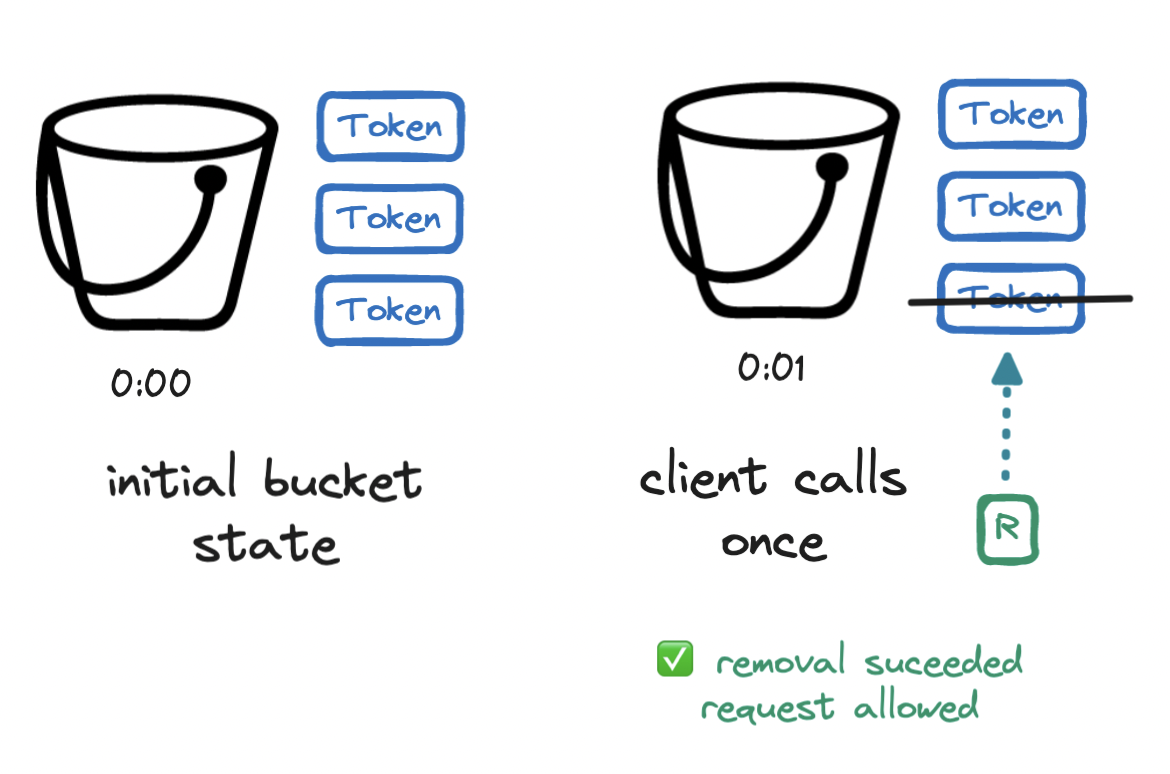
Again, let's walk through an example. Imagine a rate limit of four requests per minute, expressed as a bucket size and refill rate of three. We begin with a full bucket of three tokens. At the first second (0:01), a first request arrives. We remove a token from the bucket and allow the request.
At the fifteenth second (0:15), two requests arrive. We remove two tokens from the bucket and allow the two requests. Our bucket is now empty. At the fifty-eighth second (0:58), a fourth request arrives. We try to remove a token from the bucket, but since we cannot remove a token from an empty bucket, we deny this fourth request.
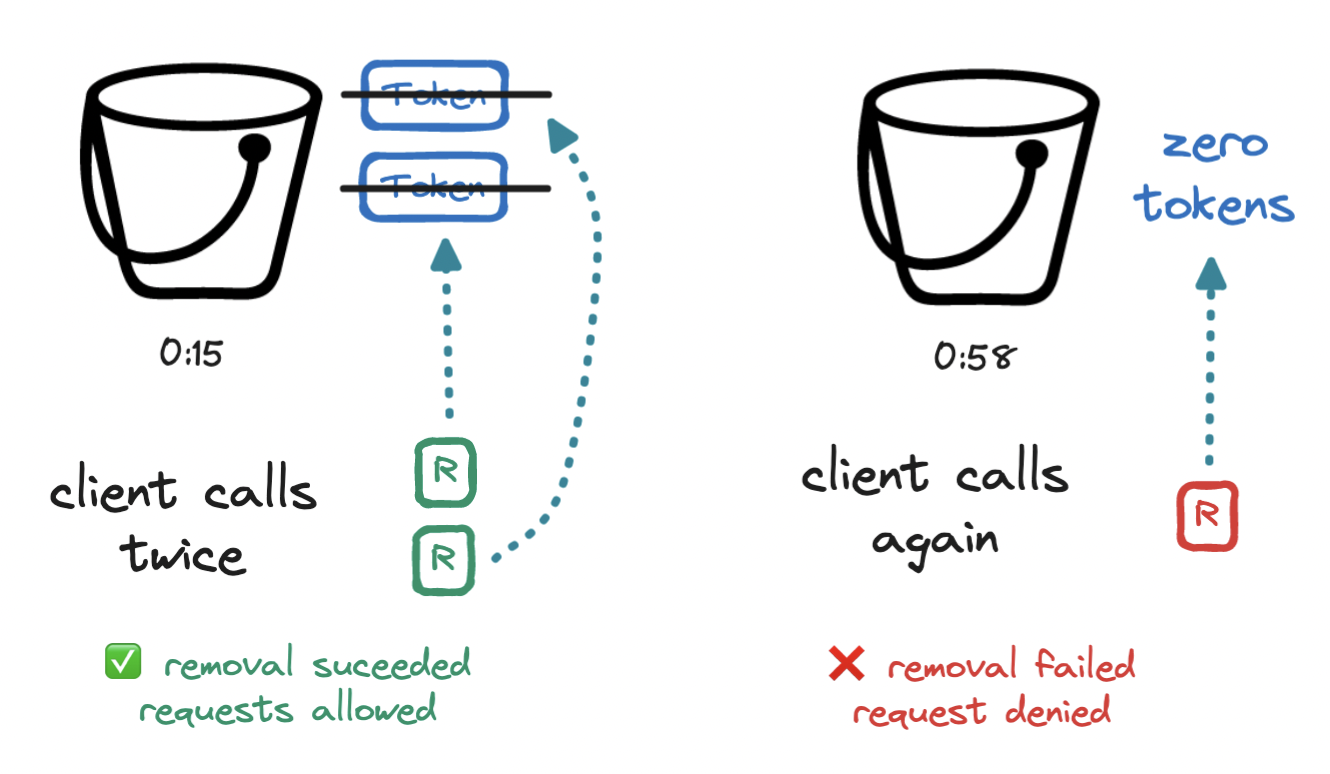
At the top of the minute (1:00), the bucket is refilled with three tokens, i.e. it returns to its initial state, and the process continues.
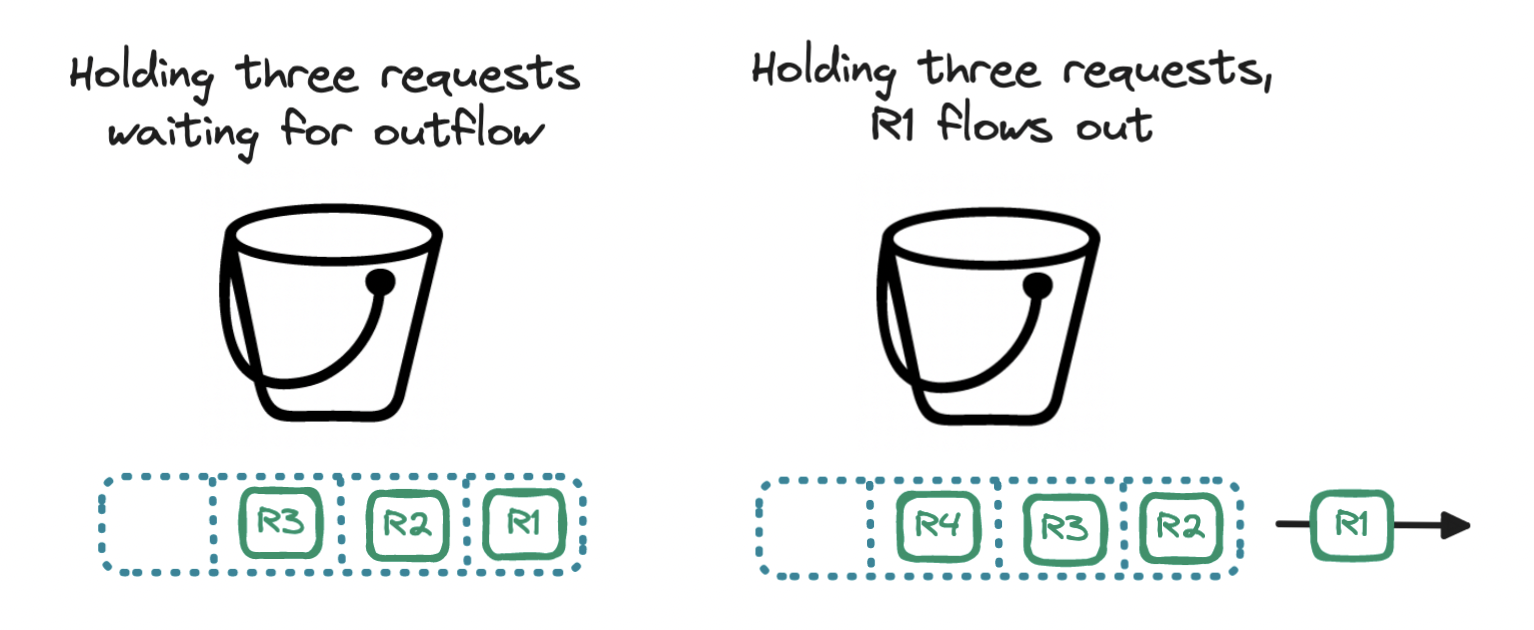
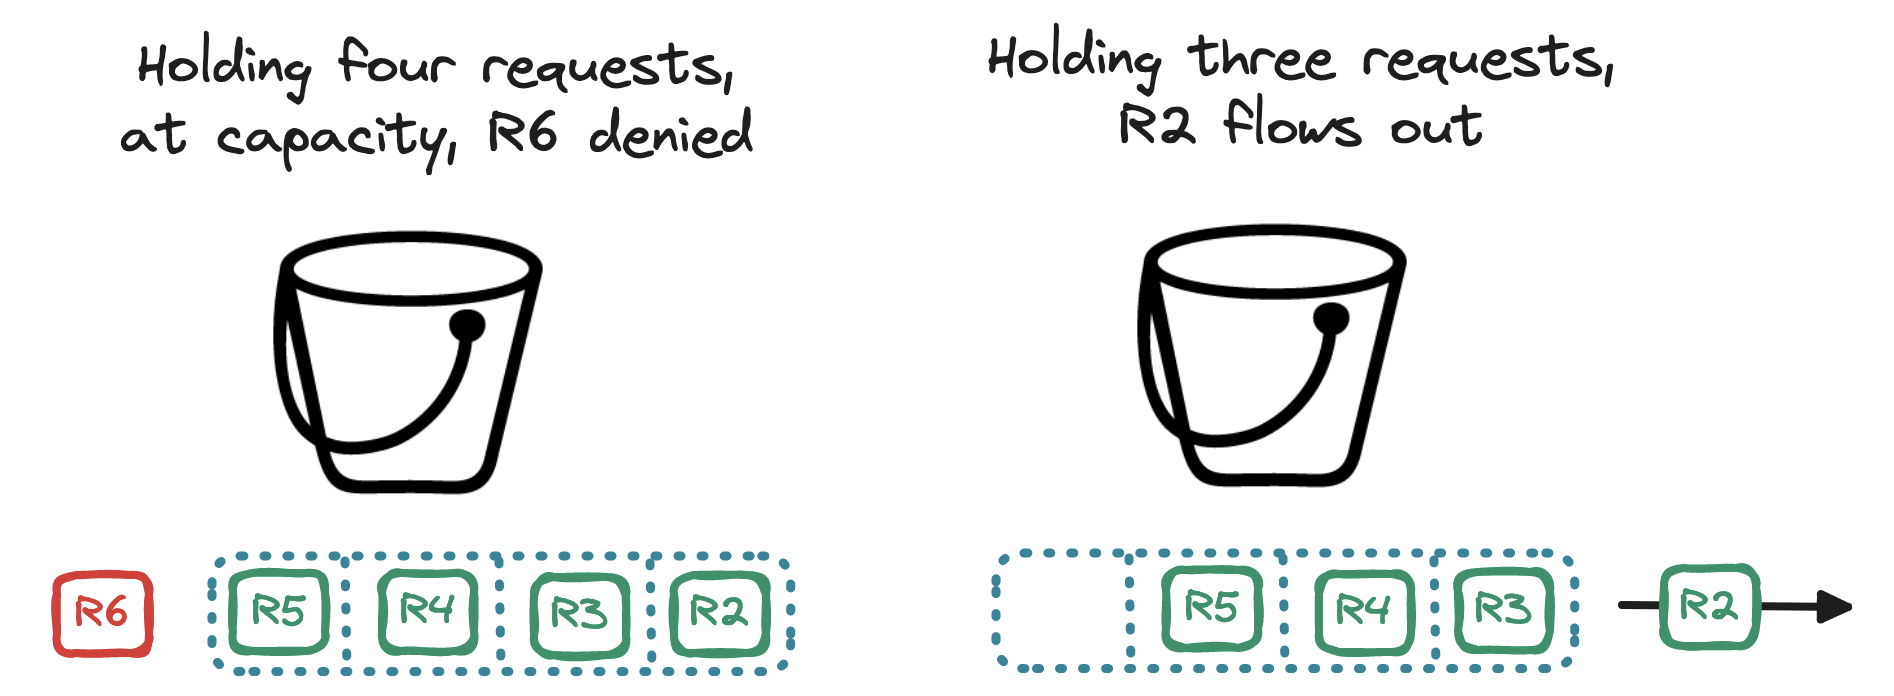
A variation of the token bucket algorithm is the leaky bucket. In this algorithm, we rely on the container but discard the tokens. Instead, we use the bucket as a holding area for requests: requests are queued up and regularly flow out of the bucket to be processed, resembling a leak. If the bucket is filled to the brim, the incoming request is denied. In essence, the bucket becomes a queue, so our rate limit is expressed in terms of queue size and outflow rate.
In this article, we covered the importance of setting clear rate limiting rules, explored why it's beneficial to enforce rate limiting, and examined which factors you should look at when designing a rate limiter based on our requirements, such as responding to rate-limited requests, locating the rate limiter in our system, storing its state in single- and multi-instance systems, and choosing among multiple rate-limiting strategies.
Rate limiters are essential in modern software systems, protecting against server overloads, preventing cost overruns, helping to optimize system performance, and granting all users fair access to our resources. By managing the flow of incoming requests, rate limiters ensure the reliability, availability, and robustness of our systems, allowing us to strike a balance between improving user experience and safeguarding system resources.
To design a rate limiter, start by deciding how many requests a user or client can make in a set period, like 100 requests per minute. This limit protects your system from too much traffic or abuse. You also need to choose how to track requests, such as using in-memory counters or a database that logs how many requests each client has made.
Next, decide what happens when a client hits the limit. You could block extra requests with a “429 Too Many Requests” error or slow them down by delaying responses. You need to place the rate limiter in the right spot, like in your API gateway or application, to handle requests efficiently without affecting your system's performance.
To scale a rate limiter, consider using a distributed approach. This means deploying the rate limiter across multiple servers or instances to handle increased traffic.
You can use a centralized storage solution, like a database, to keep track of request counts and timestamps for users, ensuring that all instances can access the same rate-limiting data. Also, implementing caching mechanisms can help reduce the load on your database, allowing for faster lookups and updates.
The algorithm for rate limiting can vary, but common methods include the fixed window counter, sliding window log, and token bucket algorithms.
The fixed window counter allows a set number of requests in a defined time frame, while the sliding window log tracks timestamps to manage request counts more accurately over time. The token bucket algorithm uses tokens to allow a certain number of requests, refilling tokens at a specified rate. Each of these algorithms has its strengths and weaknesses, so there's no "best" choice aross the board—it depends on the specific requirements of your application.

Explore CS Prep further in our beginner-friendly program.
Get more free resources and access to coding events every 2 weeks.

Connect with one of our graduates/recruiters.

Our graduates/recruiters work at:

Connect with one of our recruiters to learn about their journeys.
Our graduates/recruiters work at: