


Once upon a time, there were only two ways to run our project’s JavaScript files in the browser - add a script tag and pass a src attribute and a ref to those .js files or add more JS code inline inside the script tags in our index.html. Those options lead to some problems, in particular, lack of scalability - as your application grows and you have more modules it becomes slower and more burdensome to ship unbundled modules. Bottlenecks caused by each JS file needing it’s own HTTP request start appearing because of only certain numbers of concurrent requests possible. Not to mention the lack of maintainability because of code thousands of lines long. Module bundlers like webpack allow us as developers to address those issues by acting as a static module bundler, creating a dependency graph and combining necessary modules into bundles, which serve as static assets essential for content delivery.
webpack TL;DR
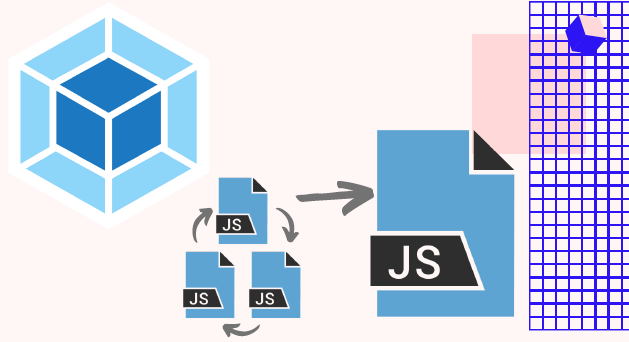
Webpack takes modules (aka JavaScript files), analyzes their dependencies and generates static assets representing those modules, i.e. you write any module format and webpack in turn allows those modules to work in the browser.
The webpack configuration plays a key role in defining how webpack processes files and modules, specifying entry points, utilizing loaders, and integrating plugins, which is essential for optimizing the build process within the webpack environment.
Why Use webpack?
There are currently two competing standards for writing JavaScript modules - CommonJS, which is a syntax used in Node.js on the server-side, and ES Modules which is used for front-end code (but is starting to be adopted by Node.js). Browser support for CommonJS is lacking. ES Modules for Node are in progress. Enter bundlers - Browserify, RequireJS, webpack and a few more players.
While Browserify lets you require(‘modules’) in the browser by bundling up all of your dependencies and RequireJS is a JavaScript file and module loader optimized for in-browser use, both have pros and cons (I encourage you to explore those through the links in the “learn more” section). webpack, on the other hand, can be considered the most flexible and that flexibility brings big advantages. Some of the extra optimizations you can leverage - code splitting or static async bundling where you can create separate lazy load bundles at build time. Through the use of loaders, modules can be JavaScript files using CommonJS AMD / ES6 module syntax, CSS files, images, JSON, etc… You probably get the point - modules could pretty much be anything. webpack is a great option for your custom needs.
Additionally, browser compatibility webpack ensures support for all modern browsers that conform to ES5 standards. However, older browsers like IE8 and below are not supported, and it is necessary to use polyfills for features like import() and require.ensure() to maintain compatibility with legacy browser versions.
How Does webpack Work?
Straight from the great documentation online - “when webpack processes your application, it internally builds a dependency graph which maps every module your project needs and generates one or more bundles.” But “How?”, you may wonder. A helpful way to think about this is that webpack needs an entry point to begin the bundling process.
A configuration file defines the entry point and other settings for the bundling process, allowing webpack to be tailored to user needs.
This entry is a module, which may point to another module through the use of an import statement. webpack will traverse the imports as well to build the graph. After the starting point - the module is then passed to the webpack compiler. The compiler then directs it into a container, and executes plugins onto it (to sort by type) before it’s rendered onto the browser.
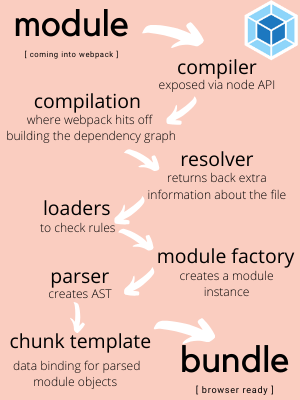 the journey of a module -> 1.compiler, 2. compilation, 3. resolver, 4. loaders , 5. module factory, 6. parser, 7. chunk template, 8. bundle
webpack Plugins
Plugins are the “secret sauce” or the “magic potion” that makes webpack so powerful for us as developers. They allow us to introduce our custom behaviors into the build process. Plugins are the backbone of webpack and they also serve the purpose of doing anything else that a loader cannot do. There is an extensive list of plugins available here.
One such plugin is the html-webpack-plugin, which enhances webpack's functionality by generating HTML files for applications. It automatically injects generated bundles into the created HTML file and offers various customization options through its plugin interface.
Building plugins is a bit more complex than building loaders but loaders are also of great importance on the module level. Loaders allow you to determine what should happen when webpack’s module resolution mechanism encounters a file. Let’s look at them more closely and also lay the foundation to build our own.
weback Loaders and How to Build Your Own
Out of the box, webpack only understands JavaScript and JSON files. Loaders allow webpack to process other types of files and convert them into valid modules. For example, take the often used babel-loader.
It is also crucial to configure the output property in your webpack configuration. The output property specifies where the bundled files are emitted and how these files are named, using the output.filename and output.path properties.
Babel is a tool that helps you write code in the latest version of JavaScript, transpile JSX or Typescript and there are also a few other things it can do for you. When your target environments don’t support certain features natively, Babel will help you compile those features down to a supported version. To transpile JavaScript files using Babel and webpack, you need the babel-loader.
For babel-loader, our webpack config file would look something like this: module: { rules: [ { test: /.m?js$/, exclude: /(node_modules|bower_components)/, use: { loader: 'babel-loader', options: { presets: ['@babel/preset-env'] } } } ] } Now let’s think about this - is there a chance you might be double matching the files when looking for a match like so “/.m?js$/”? The “exclude” property allows us to tell webpack which files to ignore. Excluding the node_modules folder to avoid further slowing transformations is important to remember when using babel-loader.
@babel/preset-env is a smart preset that allows you to use the latest JavaScript without needing to micromanage which syntax transforms (and optionally, browser polyfills) are needed by your target environment(s).
Let’s think about a few other hypothetical situations - it becomes slightly more interesting if you need to use more than one loader for a given rule. webpack’s loaders are evaluated from right to left or executed from bottom to top. If you had the following array of loaders: [‘style-loader’, ‘css-loader’, ‘some-custom-loader’], webpack will start from right to left and will then execute ‘some-custom-loader’ first, then the ‘css-loader’ and finally the ‘style-loader’.
The Build-Your-Own Part: Handling Static Assets
OK, so let’s say we need a custom loader to transform gRPC proto files. Here are the main ideas following the important steps to build our own - loaders are functions that we can define and then use through our webpack config: // The simplest loaders are functions // which take a files source and then return it
function mygRPCLoader(source){ // you can add more functionality here
return source; }
module.exports = mygRPCLoader;
Remember: in our webpack config file, a loader definition consists of conditions based on which to match and actions that should be performed when a match happens.
Additionally, webpack can be configured to generate an HTML file using plugins like the HTMLWebpackPlugin. This plugin automatically injects bundled JavaScript files, streamlining the setup and deployment of your web application.
Below is what the webpack.config.js would look like using our new gRPC proto file loader: module: { rules: [ { test: /.m?js$/, exclude: /(node_modules|bower_components), use: { loder: 'babel-loader', options: { presets: [@babel/preset-env] } } }, { // adding the new loader to the config // matching .proto
        test: /\.proto$/,
        use: {
            // To test a single loader, you can simply use path to resolve a local file within a rule object

            loader: path.resolve('path/to/mygRPCLoader.js'),
            options: {
                // keepCase
                // longs
                // enums
                // defaults
                // oneofs
            }
        }
    }
]
}
The beauty of loaders is that they allow webpack to support a wide variety of formats. You set them up, connect them to your directory structure and just like that you are provided with a set of actions that will be performed to the matched files.
Learn more: